Tag: photography

backpackingenlightened equipmentessentialsGoing Lighterkids

Vandra lätt med små barn.

Karl-Johan Piehl, van fjällfarare och tillika författaren bakom böcker såsom Sarek National Park Guide och Sarek Vandring, löpning & klättring med lättviktspackning delar här sina erfarenheter efter en Sarekvandring med barn, 6 och 8 år gamla. Det här är hans story.

Sommaren 2022 begav jag mig genom Sarek i 10 dagar med mina barn, då 6 och 8 år gamla. Två vänner följde med oss på turen och vandringen blev fantastiskt lyckad. Barnen är fjällvana, gillar att gå och har tillbringat mycket tid i fjällen under hela sin uppväxt. Efter att vi sommaren 2021 gjort ett stort antal toppturer i Härjedalsfjällen hade barnen visat sig vara redo för längre turer med mer komplexa inslag såsom Sarek ofta bjuder på. Den största utmaningen var nog inte för barnen, utan för mig som vuxen att göra en bra planering. Barnen stortrivs på fjället, och livet är enkelt där. Vikten på ryggsäcken är en begränsande faktor för hur länge vi klarar vara ute. Här följer aspekter kring hur jag resonerat.

hhhh
Karl Johan med familj i Bierikvarasj

Förutsättningar jag ville få till för en lyckad tur

  • Storslagen miljö som lämnar intryck.
  • Barnen ska känna sig starka och kompetenta på fjället. Därför ska de bära så lite packning som möjligt, helst inget.
  • Inga hungriga barn, de ska ha välplanerad mat de kan äta i adekvat mängd.
  • Vi ska ha bra utrustning och kläder anpassade för kalla temperaturer, vind, väta och dåligt väder.
  • Barnens kläder ska lämna utrymme för lite slarv med väta och smuts.
  • Tidsschemat för turen ska ha goda marginaler.
  • Barnen ska ha så fria vingar som möjligt, dvs uppmuntras ta egna beslut, styra tempo och inte radiostyras av en vuxen.
  • Jag bär så lite som möjligt.
En tarp i dcf fungerar som ett vind och regnskydd vid pauser och vid tältlägret. Tarpen på bild är från svenska Skalmo Gear

Packning

  • 6åringen bar en ryggsäck med alla sina kläder som vägde cirka 2kg.
  • 8åringen bar en ryggsäck med alla sina kläder som vägde cirka 2.2kg.
  • Jag bar en ryggsäck som vägde cirka 35kg, fick dock avlastning av en vän första 3 dagarna på turen. Maten vägde 25kg, övriga grejer cirka 10kg.

Fritt fram att räkna på vad som hänt med ryggsäcksvikter här ovan om vi använt mer traditionell fjällpackning, låt säga 10-15kg var i basvikt (exklusive mat).

Övre Rapadalen

Klädsystem för mig som vuxen: ett par ullstrumpor, syntetkallingar, löptights, ullunderställströja, vindtröja, keps, solglasögon och trailrunningskor. Förstärkningskläder: termobyxor, dunjacka, syntetdunjacka, mössa, fleecehandskar, regnställ, goretexstrumpor och regnskalvantar. Extrakläder: ett par ullstrumpor.

Klädsystem för barnen: ett par ullstrumpor, syntetkallingar, tunna softshellbyxor, ullunderställströja, vindtröja, keps, solglasögon och trailrunningskor. Förstärkningskläder: termobyxor, tjock syntetdunjacka, fleecetröja, mössa, myggnät, montagehandskar, fleecehandskar, regnställ, goretexstrumpor och regnskalvantar. Extrakläder: två par ullstrumpor, ett par syntetkallingar, ett par extra softshellbyxor. Fryspåsar att ha i skorna vid läger.

Varje detalj i klädsystemen har jag valt ut efter bästa förmåga för att vara så lätt som möjligt men ändå fylla sin funktion. I stort sett ser valen liknande ut för mig som vuxen som för barnen, undantaget att de fick kraftigare regnbyxor, mer extrakläder och tjockare förstärkningsplagg än mig. Till barn är det dock betydligt svårare att hitta bra lättviktsprodukter. Mycket av deras klädsystem köptes i slutänden från gneis.se som är bland de bästa tillverkarna jag kunnat hitta för barnfriluftskläder. Själv väljer jag ofta kläder från bland andra Rab, Salomon, OMM, Enlightened equipment, inov8, patagonia, mountain hardware mm. Ofta kläder för löpning.

Underkläder, och även barnens byxor fick jag tvätta ett par gånger längs vägen och sedan torka i armhålan eftersom utemiljön inte bjöd på torkmöjligheter.

Sovsystem

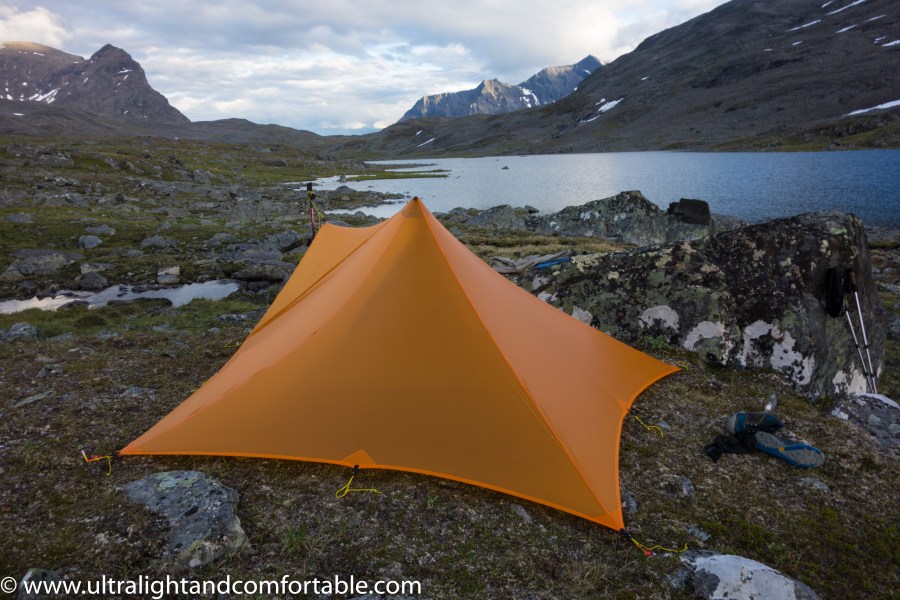
  • Tält: zpack triplex. Inköpt specifikt för turen och numera mitt enda tält. Det finns flera saker som kan göras bättre vad gäller design och slittålighet, men samtidigt så är det ett fullt fungerande 3p-fjälltält som väger 700 gram. Det är svårt att konkurrera med.
  • Varsin vuxensovsäck fyllda med 3-400gram 800+FP dun. Barnen har inte egna sovsäckar då jag har flera sen tidigare.
  • 2st 3mm cellplastliggunderlag från skalmo kombinerat med 2 st therm-a-rest uberlight
  • 1st therm-a-rest neoair
  • Vi sover med thermobyxor, syntetdunjacka, mössa och strumpor på
Kartläsning

Ryggsäckar

Barnen hade varsin 16l ryggsäck från vaude som väger in på cirka 300 gram. Min ryggsäck är en 10 år gammal 75l ryggsäck som en kompis sytt till mig i x-pack. Den rymde maten, övrig utrustning fick fästas utanpå initialt.

Övrig utrustning

Stavar till mig och barnen, microspikes till mig och barnen, Garmin inreach, tarp från skalmo för raster och läger, drybags för kläder och sovsäckar, första hjälpen, myggmedel, hygienartiklar, lagningsgrejer, solkräm, kondenstrasa, telefon, klocka, kameror, powerbanks, laddkablar, betalkort, läsplatta, karta och kompass.

Mat

Enskilt viktigaste posten att lyckas med. Jag räknade på hur mycket energi barnen behövde och kom fram till cirka 2500-2700kcal per dygn. Månaderna innan avresa torkade jag mat hemma som barnen fick prova. Mycket inspiration från boken “Snabblagat på tur” av Eric Tornblad. All mat portionsförpackades i ziplockpåsar, var livsmedel för sig. Exempelvis torkade köttbullar, skinka, fetaost, ketchup, oliver, rivna morötter, ost, pasta, tonfisk, köttfärssås mm. Köpte även med en större mängd godis, chips, varm choklad, nyponsoppa, dextrosol, sportdryck, kakor mm. I slutänden hade vi med oss cirka 2.5kg mat med låg vattenhalt per dygn för oss tre, och det var mitt i prick.

Eftersom all mat var förberedd för att endast behöva tillsättas kokande vatten behövde vi inget kök för avancerad matlagning. Min to-go-brännare Soto windmaster med tillhörande 650ml toaks titankastrull och 550 gram gas räckte gott och väl för oss i 10 dagar. Maten åt vi ur findus soppskålar med titanskedar. Utöver det hade vi plastmuggar för varm dryck, och vattenflaskor för vatten.

Camp med Ahkka bakom

För mycket packning

Vi saknade inga grejer under turen, men vissa saker kunde göras bättre. Barnen ligger dåligt på uppblåsbara liggunderlag. Ofta fungerade liggunderlaget som täcke istället – eller bara utfyllnadsmaterial i tältet. Framöver blir det bara cellplatstliggunderlag, 10-15mm tjockt. Barnen hade inte behövt fleecetröjor, myggnät eller solglasögon. Eventuellt hade även microspikes kunnat lämnats hemma, de är dock sköna att ha i svåra vad och i blöt blockterräng. 8 av 10 dagar hade vi lätt regn, kalla temperaturer och ibland vind. Mitt eget klädsystem var jag trygg med sen innan, men barnen fick prova sina – vilka fungerade bra. För kortare fjällturer med god väderprognos hade vi kunnat skala bort en del.

Vad

Det finns många olika aspekter kring att passera vattendrag. Vi gick genom Sarek i början av Juli och startade vår vandring direkt efter den värsta snösmältningen var klar. Det innebar att vi de första två dagarna hade mer vatten än normalt. Barnen är dock vana i terräng och kunde stabilt korsa de flesta vattendrag utan hjälp av vuxen. De växte under turen och upplevde sig ha god kontroll. Jag gick oftast strax nedströms och samtidigt som dem som extra säkerhet. Över de kraftigaste vattendragen höll de mig i handen, vilket nog inte var nödvändigt. Två vattendrag bar jag dem över. Som vuxen tror jag det är nödvändigt att vara van vid vad för att göra adekvata bedömningar kring vad som är lämpligt eller inte om man ska göra såna här turer. Snöbryggor över bäckar höll vi oss borta från, det är alldeles för farligt.

Vad i Rouhtesvagge

Dagsetapper

För oss är 10-15km per dag lagom dagsetapp, det går dem gladeligen. Barnen och jag har förmåga att gå betydligt längre än så i obanad terräng, men vi ville ha gott om tid för lek, utforskande och sidoutflykter.

Ekonomi

Vår Sarektur med utgångspunkt från Stockholm kostade hutlösa summor pengar. Tågbiljetter 5.5k, bussresor cirka 2.5k, båt och övernattning 4,5k och vi gjorde även ett helikopterlyft upp på fjället för 5.2k för att få en enklare och roligare start för barnen. Utöver detta tillkom utrustning som barnen visserligen kan använda hemmavid också – men en hel del är i mina ögon väl lyxigt för hemmabruk. Som tur är hade jag mycket av utrustningen sen tidigare. För en del kanske det är normalt att två veckors semester kostar 25-30k. Men det går inte att påstå att det är billigt att ta familjen till Sarek. För mig som ensamstående förälder med ett normalt jobb är det prioriteringar som gäller för att en sån här resa ska vara görbar. Hyra stuga med dagsturer från Härjedalen kan ge en fin och betydligt billigare fjällsemester, men inte lika storslagen natur!

Hjälpmedel för turplanering

För dig som är intresserad av Sarek på egen hand eller med barnen vill jag tipsa om min sarekguidebok som bland annat säljs på backpackinglight.se: Sarek: vandring, löpning och klättring med lättviktspackning. Där finns detaljerade färdvägar i Sareks dalgångar, och jag vågar påstå att det inte någon annanstans finns mer precisa eller omfattande ruttbeskrivningar för Sareks högalpina områden än de jag redogör för i min bok. Utöver det så finns även all utrustning beskrivet här ovan nedbrutet i detaljer som kan leda dig till korrekta och konkreta val av lämplig utrustning.

backpackingblogPhotographyTravel Photography

Hiking with camera gear

Bringing a camera

Fall and winter is the best time of year for photography on the trail. From all the autumn colors to the northern lights shining bright in the cloudless sky. I love Autumn for photography, and I would guess that the majority of my best pictures come from this time of year. My biggest problem with hiking ultralight, is bringing a camera – do I bring a full-frame? Perhaps a little compact camera? or more recently, maybe just my Iphone. However, in the autumn I am less concerned about ultralight, and more concerned with getting the best colors in my photos. I can’t stand sitting in front of a computer and spend hours editing photos, so I bring my full-frame in the autumn and focus on quality. 

The opening back panel on the F-stop gear backpacks is a great way to carry camera gear on the trail

Of course bringing a full-frame camera also has its own issues: How do I keep it dry? how do I carry it comfortably and so on. On my recent hiking trip to Borgafjäll here in northern Sweden, my Canon eos-r took a bath and got forever ruined. An expensive mistake. The lesson? Protect your camera, even if it has weather sealing. 

5 tips: 

If your more of a hard-core photographer, take a look at F-stop gear. These bags are proper hiking backpacks with solid frame and hip-belts, but also built specifically for bringing tons of camera gear. Hooks, pockets for filters, ICU (internal camera unit) and back panel entry, make these backpacks sublime for photography orientated hikers.

I personally use the F-stop ICU unit inside my HMG backpack. Works like a charm.

If your like me and think the F-stop bags might be a bit heavy for most use, use an ICU (internal case unit) inside your ultralight backpack. When I hiked Padjelanta trail last year with my Mamiya 7ii and a couple of lenses, I had an F-stop ICU inside my HMG windrider 4400. Worked great, not as easily accessible as using a F-stop backpacks, but certainly a good solution none-theless

An important factor in photography is to have your camera close. On the Sarek Ilforsen I designed this with photography in mind. I put two big d-rings in the shoulder straps – this was specifically to be able to hang a front pouch with a camera in, or to hang a camera directly. But strapping my camera on the front of my shoulder straps, I have the camera close to my eyes, and it has the added effect of balancing my entire pack for a better overall feel. 

Another tip here, not necessarily coupled with carrying your camera, but with being able to keep your lens clean. Bring a proper lens cloth! This happens to me from time to time that I forget to bring a small micro-cloth that can clean my lens. After a day of rain I have spots and smudge marks all over my lenses.


Having two big d-rings on the soulder straps is a great way to keep your camera close to your eyes.

Get out there! When I hiked Borgafjäll in September, I had no idea what the weather would be like. I didn’t care. I figured if I had clothes to keep me warm and dry, than I’d be good to go. As luck would have it the sun was shining and the clouds were clear – to my amazement, I woke up in the middle of the night, crawled out of my tent and was shocked by the incredible northern lights display that engulfed my entire field of view at the top of the mountain. I felt alone in the universe, in awe of the sights all around me. My point: Get out there if you want to get inspired. Sitting on your sofa dreaming of the perfect shot is not the way to get “the perfect shot”. 

What are your best tips for bringing proper Full-frame camera gear with you on a hike? let me know!

Kindly,

Kenneth Shaw

Check out more F-stop gear at https://backpackinglight.dk/brands/f-stop

Landscape photographyPhotographyTravel PhotographyZambia

Life in Zambia

Some of you may not know, but since about mid February the family and I moved down to Zambia to adopt a beautiful little boy named Richard. Life here is certainly different, and having two son’s instead of one is also a big change. We live in Lusaka on the southern part of town in an area called Chalala. It’s a nice, quiet area of town that is rather close to the orphanage where Richard was living.

This hasn’t been a trip of wondering safaris and adventure. For the first month we only had permission to come by and visit Richard. So, everyday for a month we drove back and forth to visit Richard. Now, after two months we have full custody of Richard and he seems to really like being with us. We are now finally starting to be able to explore, unfortunately I am a bit out of action at the moment with a broken rib after falling hard on a slippery floor.

However we have made a few outings, with the most spectacular being Livingstone and Victoria falls. Livingstone is the town that hosts Victoria falls on the Zambian side of the border.

On the first day of being in Livingstone it was raining heavily – so instead of heading to Victoria falls we decided to do Musi-oa-Tunya national park for the day. It was an incredible journey where all the animals were out enjoying the rain. Giraffes, Elephants, Water buffalos and monkeys among many more.
There is an elephant there… I realise that my photography sinks a few notches when my family is with me. Perfectly natural I suppose.
Victoria falls from a distance.. Caught on the Canon 6d mark ii with 16-35 2.8 lens.. To say that the falls are impressive is an understatement.
This time a little closer – If you look closely we are drenched – it is not raining, this is from the mist of the falls. The bridge has a river of mist flowing and the entire hillside is like walking through a drowning shower on full blast.
Richard showing off how wet he is from the Victoria falls mist.
Alexander yells out at me “daddy look, take some pictures I’m going to pose…”
Looks perfectly safe.. ….. Zambia!
The minimum wage in Zambia is about 100 usd a month. While this won’t get you more than barely a candy bar in Sweden, in Zambia it’s enough to eat three meals a day on, have a home and cell phone. It’s not luxury, but it’s not death by starvation.
Walking down the street in livingstone
backpackingblogcamping

2019 a year in travel – What to bring?!??

2019 is going to be a fun year! Starting off with a few weeks in Vietnam, than followed up with 6 months in Zambia! We will be traveling, exploring and above all else living a new life with our adopted child. I am really looking forward to this time to just focus on family and Backpackinglight. I will be backpacking as much as possible in Zambia, but hopefully I can get my family out with me. With that said, this also creates a lot of logistical problems for me and for the family. Being a minimalist in a lot of aspects, especially in travel, I now have a problem. I can’t exactly live in Africa with only one backpack with me. There are now a lot of different aspects I have to plan for.

  1. Living a day to day life
  2. Running my business
  3. Travelling and photography
  4. Backpacking
  5. Videography

These different hobbies and aspects don’t fit in one minimalist Minaal travel backpack… unfortunately. While I can normally have everything I need for any amount of time travelling in one backpack including camera gear. The length and goal of this trip to Zambia means that I also need to bring backpacking gear to test and take videos of. It is not possible for me to buy the gear and have it sent to me in Zambia as it is too expensive, and too many possible problems.

Projects during the trip: 

  1. Photography book – Zambia in pictures. Daily life and turists
  2. Vlog – Daily short stories of some kind

The part of planning here that is easy are the first two:

  1. living day to day: I would need my computer, clothing, running clothes and shoes.
  2. Running my business: Easy enough – my computer and bank cards

The harder part in the planning is the last two for different reasons:

  1. Travelling and photography
  2. Backpacking and hiking
  3. Videography

I will start with travelling and photography – Is there one camera that can be great for video and stills? Vlogging and documentary style video? Sharp pictures for everything from street photography to Astrophotography? Am I willing to bring a lot of weight? so probably a lightweight camera that does everything.. does it exist? I currently own a Canon m50 that I kind of bought to hold me over until I could find the perfect camera for myself. I have had and tested tons of different cameras and like the ease of use, autofocus and colors of the M50. I actually sold my Fuji X-t2 for an Olympus Omd EM5 ii.. A great camera, but not the greatest video – this could be said for both the fuji x-t2 and EM5, But I fell in love with the flip out screen of the Olympus. The Fuji had great stills but not the greatest for video as autofocus was weak. Maybe the XT3 is ready for a new chance? The M50 is great, but, the dynamic range is not great, it’s not weather sealed and high ISO is non-existent.

So for me to figure out what I need and what I want and hopefully find a good camera for that. I will write down my list here

Needs: 

  1. Good out of camera video colors – I don’t edit colors much or at all
  2. Good stills – sharp and with decent dynamic range.
  3. Weather sealed – I am in the elements a lot – I don’t bring the m50 because of this
  4. A flip out screen (maybe not the biggest need.. but close to it)
  5. Slow mo up to 60 FPs – but I won’t complain with a 120FPS
  6. Mic input
  7. good, fast Autofocus – As I normally film myself autofocus has to be good
  8. Great battery life
  9. Good depth of field – I like blurry backgrounds

Wants:

  1. I want my camera to look damn good (I see you Olympus OM-D 1 mark II)
  2. Lightweight if possible
  3. 4k.. maybe, I suppose it would be useful.. maybe.. not much of a want or need really
  4. A great wide angle lens

Cameras I am currently looking at: 

Canon 6d mark ii – Ticks a lot of the needs, but HEAVY when you count in the glass as well. A bonus here is that I can use my glass on both the M50 and the 6D. The biggest problem I have with the 6D is the company that makes them.. I don’t want to support a lazy, uninspired company. Canon is just pathetic in a lot of ways and giving them my money just doesn’t feel right.

Fuji X-T3 – Ticks also a lot of the boxes for me – though no flip out screen and Autofocus? hmm not sure. Also I really liked my X-T1 back in the day.. Though I do like the company and cameras

Olympus OM-D E 1 mark II – Looks great, ticks a lot of my wants and needs.. but maybe not the greatest depth of field.. not to be underestimated of course, but can’t compare to full frame.

Canon EOS- R – Another uninspiring effort from the company of mediocracy. But light, good colors, Full frame and flip out screen

Nikon Z6 – Because if I’m dreaming I might as well dream of them all..

Last but not least – sell all of it and but a small compact camera like the Sony rx 100.. Nobody cares about the gear anyway.. it’s about the content 🙂

Backpacking gear

This is where things get a little interesting. While I won’t have time to take week long trips solo, I do have plans to bring the whole family on different trips throughout the country, car camping and maybe even campground camping. But I do want the option to pick up and go backpacking by myself. So the question here is do I bring two tents – one two or three man tent that my wife and kids can sleep in and a solo tent for me. (I don’t like sharing a tent anyway). Or do I bring a big tent that is lightweight to use as a solo tent as well? This same reasoning basically needs to be applied to everything.

So if I’m looking at tents – do I bring something like the The Tarptent saddle, Big agnes Copper spur 3 and a solo tent to match like a Plexamid or Stratospire. Or do I just bring the Hyperlite mountain gear Ultamid 4 with inner-tent? I’m leaning towards the Ultamid as that keeps everything simple, but I really don’t like sharing a tent…

Quilts, sleeping bags, kitchen sets, hiking gear, backpacks so on and so forth.. Am I trying to combine too many hobbies into one trip? Even if we are gone for six months, maybe the better option is a camper van with day hiking gear instead?

As I’ve said.. this really is a pain in the ass.. But I think I answered the question by writing this.. Solo gear, as light as possible and car camping otherwise.

Vlogging? 

This goes back to my video and camera gear – I am thinking about doing a vlog for during my trip in Zambia. The question is what will it be about? I don’t like reality TV, or Reality vlogs and so on, and I would never want to force my life upon other people in that manner. There needs to be a story, a reason to watch, fun and interesting. I don’t want to only do gear reviews. I want to capture life in an interesting way.

backpackingblogcampingLandscape photographyPhotography

Pictures from Borgarfjäll

I recently had an outing with a few friends here in northern Sweden up in the Borgarfjäll mountains, about 350 kilometers inland from Umeå. This was the very reason I moved back to Northern Sweden: To get to the mountains! This was a fun trip, and more in line with car camping perhaps than a rough tumble through the wilds of Sweden, but I had fun non-the less.. In fact, there is something to be said about parking the car outside a mountain top, summiting, sleeping over, fishing and coming back down again. I was out a total of two nights and it was well worth the drive.

This trip also gave me the chance to test my Sierra designs Cloud sleeping bag/quilt and using my Samsung 9+ for all video and photography before taking my planned longer fall trips. Video coming eventually…..

20180914_182655

The view from Buarkantjahke at about 700 meters

20180914_182701

20180914_193452

A lot can be said about the Zpacks Duplex – but there are two that define it most: Light and Cold. What you gain in weight, you sacrifice in size and “tightness”. This is a payoff usually worth the cost, but in cold, fall conditions the Duplex should be changed out for tents better situated for these conditions.

20180915_090506.jpg

The Zpacks and Hilleberg Allak side by side.. both did just fine in the mountains – though the Allak weighs about 2kg more.

20180915_103302

My favorite pack: the Hyperlite mountain gear windrider 2400. A great combination or weight, robustness, usability and looks.

20180915_104058

Me

20180915_10430220180915_110830

David finding loads of chanterelle mushrooms – we filled up several plastic bags with mushrooms.

20180915_133429

The view by Saxån overlooking Buarkantjahke mountain. 1235 meter peak and were we camped the night before at around 900meters.

20180915_183950

On the way back from Borgafjäll I walked a few kilometers along Lögdeälven and camped right by the water

20180915_19113420180916_092055

Down by Öreälven

blogLandscape photographyPhotographysarek

Sarek i Bilder (in pictures) – Part 1

My schedule is filled at the moment while trying to get Backpackinglight.se up and running. So instead of a long trail report, I will post some pictures! More pictures coming soon.

DSC06408
Mukka Stugan is a small little emergency cottage that while offers a nice place to eat lunch while it’s raining, has unfortuantely become a trash can for hikers who can’t be bothered to bring their trash with them.

DSC06344

The Trailstar by the glacier river.

DSC06368
13 kilos for a 9 day trip – fully safe and secure with a fishing pole and satellite phone to boot. My packing is watertight, I’m set for far below zero temperatures if needed.

DSC06267DSC06388DSC06411DSC06541

Dinner!

DSC06478
Taking a coffee and candy break while drying out my shoes.

DSC06492
It looks like hell, but believe me, this is some of the best aspects of wearing trailshoes in the wild. When my feet get hot I can just go trudging through some cold water. No blisters, no pain, no problems! Trailshoes are a luxury few have yet discovered.

DSC06515

Down by Rapadalen – Amazing

DSC06546
If only Ron would let me sell his MLD gear! The yellow trailstar is probably the single most beautiful tent build today. An incredibly light and well performing piece of kit.

DSC06882
My Fizan poles and HMG windrider 4400 after a week in Sarek. Both performed incredibly well – so good in fact that I will be supplying both at backpackinglight.se. These are simply the best products available for their intended purpose.

backpackingblogGear listPhotographyultralight backpacking

My camera gear for Sarek 2017

I find that I absolutely love video diaries of backpacking.. I have been following and watching them for years on YouTube, but I never really got around to doing it myself. I’ve tried a few times on a smaller scale, but never any real effort. My YouTube channel I don’t even bother marketing and in general I’m not very active on there. I’m not sure why this is to be honest, i guess I just couldn’t figure out how to make it work in practice while holding onto my ultralight philosophy. As well as being stuck on just doing gear reviews, which honestly, is a chore. On top of that I’m not really a computer guy – I don’t like editing video or photography and making an interesting video out of hours and hours of footage is no easy task.

With that said, because I love the format of video documentaries, I am going to start working on it more and more. I am changing up my camera gear for my upcoming trips along the High coast trail in northern Sweden and my two weeks through Sarek journey. My strategy is simple: Record everything! I found out the hard way that it’s damn difficult to make an interesting movie with limited footage. I have been editing my Iceland video now and realize that I hardly recorded anything at all, so as an embarrassment to myself and to the suffrage of everyone watching my videos, I do a 2 minute intro where I’m just describing what was happening… In any case, it kind of works, but would have been better to show instead of tell.

A link to the video: Alone in Iceland part 1.

This means that my Fujifilm x-t2 camera and lenses have been sold to make room for video gear and after my Iceland trip, I’m convinced a pocket camera works wonders for what I do. So some of the gear that my Fujifilm x-t2 has financed so far are as follows:

Gopro hero 3 black edition with accessories – used cost about 150USD (200 grams)
Ricoh GR – An excellent digital compact camera that I absolutely love 200USD (245 grams)

ricoh-gr-front
I used the Sony RX100 in Iceland, however I find the Ricoh GR to be a completely different beast altogether with regards to picture quality

DJI Spark drone and controller with two extra batteries 1000USD (550 grams complete)

dji-spark-white-hover
The DJI Spark is a tiny drone with serious power

To top it all off I have two 20100mhv battery packs to keep everything charged along the way.

I’ve sold all my Fuji gear for around 2400USD

Total weight for my new photography and video gear = 1095grams
Total weight of Fujifilm x-t2 with lenses and batteries = 1114grams

Weight of battery packs 490grams each (added one for the drone)

Total weight increase for new system: 300grams

Total money savings: around 1000usd

I can live with a total weight increase of 300grams for so much more flexibility and control. The Ricoh GR works fantastic for me as almost all my photography in the wild is at 28mm, no matter what lenses and cameras I have with me – my shots are always wide. and now I have true video capabilities.

Concerns about drones: I got some feedback with regards to bringing a drone with me or drones in general. It seems to be a very hot topic in the USA and something I hadn’t thought about before as drones have never bothered me personally. I will call it the “road rage syndrome”, there are people who have an incredible amount of pent up rage and are looking for something to go bezerk over and I have to take this into consideration when flying the spark.

To the advantage of the spark it is tiny, unobtrusive and quiet. With that said I think drones should fall somewhere between loud music in camp and deficating on the trail.  Neither of these should be practiced, and with proper fore thought and consideration for others, can easily be avoided.

My strategy for succeeding with video:
Record everything! Better to record days and days of video and edit down to a highly interesting 30 minute clip, than to take minimal video and try and stretch it out.

I also need to work on my editing skills. I don’t like working on computers that much, so I will have to find presets and styles that I like so I can get my editing done quickly. I also know what kind of footage I like – So I will try to emulate this.

Where it could possibly fail:
I like to keep things simple, sometimes it’s a hassle to record. To always have to think about the shot. To pull out a drone and start recording takes me out of the moment. hopefully I can overcome this, as I find I really love the video format, and I love watching my old videos of all the hikes I’ve done. (sadly I have barely edited any of them… so nothing is on youtube yet)


GearPhoto reviewsPhotography

My favorite backpacking cameras

Through the years I have used many cameras on the trail, and several of them I have written reviews on. I thought for fun I would include a few pictures and a few of my favorites here. I know what your thinking, it’s not the gear that makes the photographer, and it’s absolutely correct, but it sure does help to have quality gear that inspires. You will notice I don’t put any importance on year the camera was made, I do this because I don’t really care. I love the Sony rx100, is it as good as the rx100 m4? probably not, but I wouldn’t know as I haven’t owned the m4. I have owned the m3 and I thought it too was an excellent backpacking camera. Anyway, here are my personal favorites:


Fujifilm X-T1

OLYMPUS DIGITAL CAMERA

It’s hard not to love this camera. It takes amazing pictures, the XF lenses are the best lenses on the market, and to top it off because of the release of the X-T2, the X-T1’s are relatively cheap now. The fujifilm with the 18-55 kit lens is a fantastic backpacking combination that weighs around 800 grams total.  16mp sensor.


Fujifilm X100s

$_32

Super crisp pictures and a set focal length of 35mm. What’s not to like. Missing the classic chrome film simulation mode and not really the best for video. However, an excellent backpacking camera. weighs 430 grams and 16mp sensor.


Sony RX100

121031_sonycybershot_003-660x440

Small, light and excellent sensor. I used the sony RX 100 on my solo trip in Iceland and don’t regret a thing. Perhaps not the best quality when compared to Fuji, but still an excellent all around compact camera. 245 grams and 28-100mm lens and 20mp sensor. These can now be purchased relatively cheap on the classifieds.


Sony RX100 m3

Z-SONY-RX100M3-FL-EVF-FLASH-L

Everything I love about the sony RX100 the M3 does better. The lens is criper, the files are cleaner, the sensor is better and the Sony RX 100 M3 even has a built in viewfinder and HD video. Only negative? 24-70mm lens is perhaps less flexible than the 28-100 on the Rx 100.


Ricoh GR

ZYFRONT-LG

Small, light, excellent pictures and sensor… what’s not to like? Some people don’t like single focal length cameras, personally they are my favorite. I hate having to think about what lens might work best for a certain situation. Why bother? The 28mm lens on the Ricoh GR is one of the best on the market. Excellent for both backpacking and street photography. The Ricoh GR weighs 245 grams with battery and has a 16mp sensor.


Fujifilm X-T2

IMG_7566-acr

The Fufilm X-T2 is no simple upgrade. It’s basically a completely new camera as compared to the X-T2. Sensor upgrade to a new Xtrans 24megapixel, two memory cards, autobracket for HDR and 4K video to name just a few of the upgrades. The downside of course being that a X-T2 will cost you twice as much as the X-T1 at the moment. But like all the Fujifilm cameras, the X-T2 is probably the best mirrorless camera on the market and easily competes with most full frames. The weight is similar to the X-T1 at 450 grams with battery.


Runner up:
Sony A7R

Small body, clunky lenses and massive files that takes days to transfer to computer.. Excellent picture quality but a bore to use. Some of my best pictures have been taken with the A7R, but I can’t recommend the camera as for every one excellent picture 10 are bad. Why? because the shutter causes vibrations in the photo making sharp pictures handheld very difficult.

backpackingblogDestinationsLandscape photographylaugavegur

Trip report: The Laugavegur trail day 4

Emstrur (Botnar) to Þórsmörk

— 15 km, estimated walking time 6-7 hrs, 300m net descent —

dsc07873

Again, I was left breathless by the amazing hike. Glaciers, desert, rivers, mountains and forest all within a 15 kilometer hike. This day starts off in the canyon of Syðri – Emstruá. Here there is a steep path that leads a bridge that runs over the glacier river.

dsc07895

There is something epic about a raging river being fed with a glacier.. simply amazing. I sat here for sometime and ate my breakfast and just enjoyed the incredible view, engrossing my soul completely in the moment.

dsc07894

I learned along this trail that it was time to replace my beloved Haglöfs LIM trail shoes. I decided from this moment on that I would wear trail shoes that had toe protection and better grip. On top of that I realized that I’m not really into video production.. I shot hours and hours of video along this trail and so far haven’t edited anything.. I prefer working with photography.

dsc07910-pano

After this long trek along the sandy, volcanic ash desert everything changes to a kind of mini forest.

dsc07932

dsc07949

This little house just seemed lost in the wilderness – It was the first house I’d seen for days.

dsc07951

The house from a little further out.

dsc07967

dsc07986

After a long walk came this amazing water crossing along the Þröngá river. As always the water is freezing cold, but barely knee high throughout so wading is no problem.

dsc07992
The little village at the bottom of the valley is Porsmork, while I will be staying in Bazar, I wanted to make the little 8 kilometer detour to Porsmork to drink beer and eat peanuts. It was worth the walk. You can even take the bus back to Reykjavik from Porsmork.


From Porsmork I made my way on to Bazar where I would be sleeping for the night.

dsc08015

While this was not Bazar, it was nice nonetheless.. Not really sure what this place was called, but it was nessled between Porsmork and Bazar.

dsc08023

After a quick walk over this glacier river, I soon arrived in Bazar where I would throw up my tent and make camp for the night

Once my tent was setup I made my way to the river, laid down and chilled out for a few hours before heading off to bed. Once again, the Laugavegur trail delivered on it’s incredible views and serene enviroment.

dsc08062

Trail report: the Laugavegur trail day 1
Trail report: the Laugavegur trail day 2
Trail report: the Laugavegur trail day 3
Trail report: the Laugavegur trail day 4
Trail report: the Laugavegur trail day 5

blogDestinationsLandscape photographylaugavegurultralight backpacking

Trip report: The Laugavegur trail day 3

Alftavatn to Emstrur (Botnar)

15 km, estimated walking time 6-7 hrs, 40 m net descent

I was in no rush to leave Alftavatn, the views were simply incredible and it was nice to just hang out for a while. I knew that walking through this valley would be an amazing adventure, and with that, I laced up my trail runners and made my way towards Emstrur.

dsc07717

From the very start on the way to Emstrur, this incredible view is what I was met with. The hike from Alftavatn to Emstrur is by far the most picturesque of all the sections. From this kinds of green rolling landscapes, into long deserts of volcanic ash and a massive glacier looming in the distance like a constant reminder of the true wild that you are in.
This hike felt long, maybe it was the deep ash or the several large river crossings.. who knows, the hike is easy, but feels much longer than the 15km that it actually is.

dsc07722

The first real water crossing is about 3-4 kilometers from Alftavatn. Here I passed a whole group of heavy-miserables while they stopped to take of their boots and socks 🙂 I just trugded through, admittedly the water was cold but I warmed up quickly.

dsc07736

Here the trail takes us over the low ridge Brattháls into Hvanngil. If your looking to book a room in advance in Alftavatn and it’s fully booked (not unlikely). Check out Hvanngil, as it’s not always a known campground.

dsc07752

The first real river crossing is made on this part of the trail. It’s wide and irratic, you will have to walk around a while along the river Blafjallakvisl until you find a very wide part, and there crossing shouldn’t be a problem. You will notice however I stopped on a little sandbank in the river. I didn’t actually stop here to take a pic, to be honest I stopped here because my feet felt frozen solid from the ice cold water..

dsc07777

To say that the views along this part of the trail are amazing is an understatement. While I always find nature to be awe-inspiring, this particular part of the trail was something altogether different. I had the feeling of walking along the art gallery of god – his best pieces of art all laid out along a 15 mile trek. I took my time here, stopped often and forgot about everything else in the world, nothing mattered, I was lost in the moment and it was one of the greatest moments of my life.

dsc07787

dsc07788

dsc07798

After a while we come along the river Nyrðri Emstruá, which thankfully is bridged.. From here it’s only a few kilometers left before reaching the campground at Botnar.

dsc07773


DSC07809

After an incredible walk we come in towards Botnar which resides in the Markarfljótsgljúfur canyon with the glacier in the background.

dsc07818

The campground in Botnar is well protected from the heavy winds blowing down from the glacier. The views are incredible here and there is even a little shop here if you need some resuplies. 3G works perfectly fine along all the campgrounds throughout the Laugavegur trail – so calling home wont be a problem.


Trip report: laugavegur trail day 1
Trip report: laugavegur trail day 2
Trip report: laugavegur trail day 3
Trip report: laugavegur trail day 4
Trip report: laugavegur trail day 5