


Making memories together
Katrin and Elva Petersson, mother and daughter (14 years old) performed the Green Ribbon (1300 km) together in the summer of -21.

Tell me a little bit about you?
-We, mother and daughter, Katrin and Elva Petersson (14 years old) are very fond of enjoying adventures together, especially in the mountains. There have been a couple of long hikes last summer holidays where we have been out for several weeks at a time, most recently for 11 weeks. It’s something special to be out for a long time, hard to find words for it but it does very good on the inside, empowering and so we have so much fun together out there.
You made the green ribbon together for the first time in the summer of -21. How was it?
-It was absolutely the funniest thing we’ve ever done together, me and my daughter. It was insanely challenging with the heatwave day and night for at least a week and then the blizzard on what lasted at least as long where everything was basically wet. For several hours we walked our way through knee-deep marshes and we chose a lot of unedited trails where it was horribly exciting at times when we found bear poos, absolutely amazingly strengthening in every way, just everything!
How did you prepare?
-We walk a lot in everyday life as both me and my daughter grew up without a car. Just before the Green Ribbon we walked for 1 1/2 years, 2 hours was weekday morning to school & work in all weathers. On weekends we often took a trip in the forest at home on a trail that is 10 km. A couple of weeks before the start, we stepped up and walked with the gasket/ weight. both on the weekend tours and on the everyday walks. For example, I came to work every morning with my backpack filled with 6-8 L of water.
-The mental preparation and the challenge it will be I was confident with, from our previous long trips and certainly also that out there our routines, day rhythm and small chores fall into place quite quickly.

Do you have any more exciting tours ahead?
-At the time of writing, it is exactly 1 month since we got to the finish line on our Green Ribbon, out there on our day no 65 and it has not been a single day since we came home without sharing lovely memories and challenging strengthening memories here at home which has contributed to us now having thoughts of going the Green Ribbon again. The next Band will then start from the north, (we started from the south this year) and we plan to explore new hiking trails along the band and visit favorite places again such as Skierfe in Sarek that we have climbed now 3 years in a row. The most beautiful place I know! Would also like to explore the Norwegian mountains a little more, as well as cross Sarek National Park and visit the caves of little Vadvetjåkka National Park.
What if you were to give any advice to future Ribbon mountaineers?
-If you are already a hiker and have been to the mountains before, you really just have to put one foot in front of the other and welcome the weather you are offered. A hefty dose of stubbornness and purposefulness is a great advantage while being able to enjoy right here and now in everything you are offered. It’s out there between the start and the finish that all the nice things are created. Before the band, the best tip is to go as much as you can everyday. I strongly believe in a good basic condition and walking in all environments, forest, asphalt etc. it is so much more than hiking trails out there. Get your shoes in properly, really properly! (We recommend light trail shoes) practice with the packing as well, several miles and pack with you absolutely ONLY the most necessary! It is the food that is heaviest so send up depots that you pick up along the trail. You’ll also pass a couple of grocery stores.

Highlight equipment that you recommend?
-I am very happy with the equipment we have, like to stay warm while the backpack is light. I am very fond of equipment that can be used in several different ways, for example we set up our tent with the Fizan trekking poles, use hair clips as washing clips for the laundry that get to dry at the back of the backpack etc. when we hike. All to make the gasket as small and light as possible. I myself am small and light in the body and then it is extra important that the packing is easy, not only to make it as enjoyable as possible, but simply for a long walk to be possible. Some absolute favorites in the equipment are: Altra Lone Peak trail shoes, love them, both me and the daughter have had these on all our hikes and have Altra even everyday. Are also very fond of our backpacks, Hyperlite Mountaingear, 45 L, holds all the little you need and is very comfortable to carry.
Any things there that you want to replace for the next tour? I’m very happy with everything, but for the next long hike we might invest in a new tent. Our current tent Tarptent stratosphire 1 with solid inner tent, (a one-man tent that we slept really well in together in weather and wind on all previous mountain tours) but which now after 135 mountain nights has been worn in the zippers. The daughter has also become bigger since our first mountain tour so we may invest in something bigger and even lighter in weight.
If anyone want to follow your journey forward?
Please follow us on instagram @make.memories.together
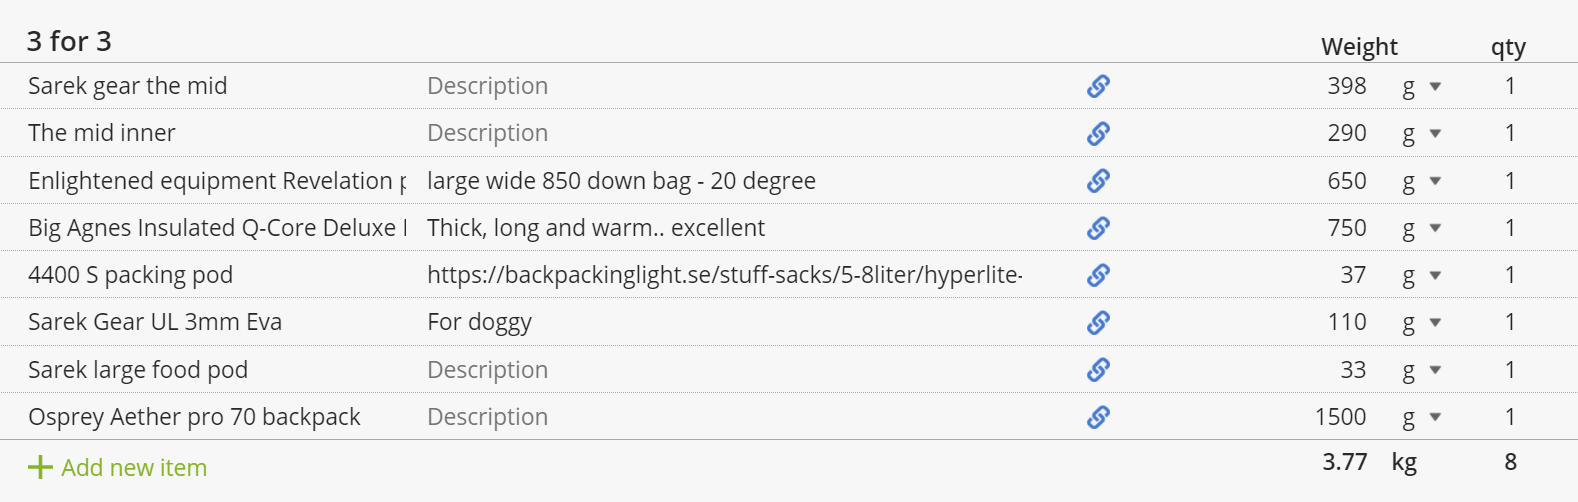
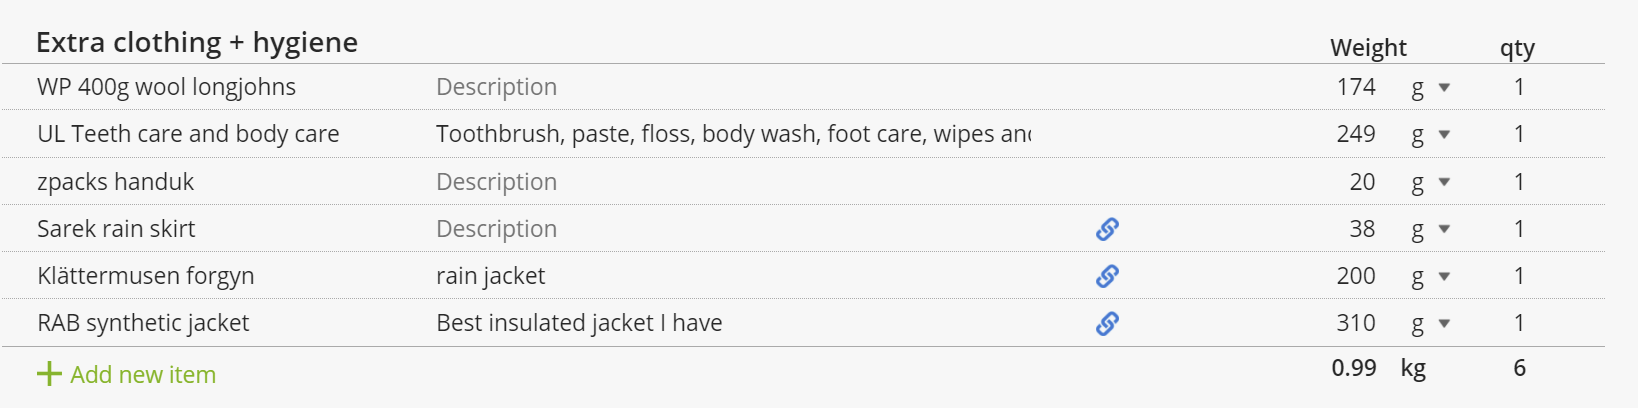
Packing list : https://lighterpack.com/r/1xsvvu
Recommended Gear. At Backpackinglight.se you can find recommended equipment for the White and green Ribbon


